Sunday 23 December 2012

Merry Christmas fellow bloggers. Hope Ye're all enjoying the holidays. I know some people may be wondering why I'm making a post at this point, when I should be chillin'. Well I'm not trying to earn brownie points or anything like that, it's because my computer is playing up any I want to ensure my work to date is recorded. When you think about it these posts are an extra back-up. So I might as well bring things up to date regarding my project. Before the holidays I was working on a 3D piece composed of a paper sculpture which represents the space I occupy. It looks rather skeletal which is fine as I had never intended to portray a solid figure. There is also a degree of transparency, which I was also going for so although I didn't get to complete it I'm happy with the result. Feel free to give some feedback (critique), it's valuable to me either way.


The images show a progression of the construction process. The upper torso area is based on a rib cage which gave the initial impression of a skeleton, so I think the addition of limbs in a more cylindrical form alters this. Although light, the sheer volume of paper, and eventual position - suspended - required a 2.5mm wire armeture. This actually worked out well as the 'face' ended up being cast in wax, as opposed to my original intention of fibreglass, which I believe is lighter and may have been supported by paper. My reason for suspending the piece was the result of my research into 'sensing' one's space. Recalling from personal experience the sensation felt when floating on water, i.e. dead mans float, of being totally relaxed, drifting, oblivious, and yet aware of your position in relation to your surroundings (especially the shore). Without deliberately trying you sense what's around you - the space available to you. Thinking along this line I remembered seeing something similar in a movie that involving body suspension in mid air. The film is called 'A man called horse' starring Limericks own Richard Harris (coincidence?) and part of the plot involves Harris's mid-air suspension as part of his initiation into a Native American tribe.
                                                    
Body suspension originates from Native American and Hindu culteres. The practice has been going on for thousands of years as rites of passages, healing rituals and as a means of leaving the body and entering the spiritual realm. One notable native American ritual is the Sundance, in which the person is pierced through the chest and attached to a sacred tree. The person then pulls and dances until the piercing rips free. After the trance, when he is free from the hooks, he is also free from the prison of the physical limitations, he is reborn, like the sun.
My interpretation of this ritual is that during the trance-like, meditative state induced by the ceremony, the person is still aware of (sensing), thier space.
In today's world there is a movement emerging among adepts of body art and body modifications which aims to revive the spiritual experiences of the primitive tribes by performing rituals such as body suspension and body piercing. Many people who have gone through the experience state that the pain is easily overcome by the sensation of being above the physical senses.
Had I managed to finish this piece, or at least the other leg, I'd intended to suspend it from six points, as seen in modern day practice. If you can imagine, two opposite points on the upper chest, two on the mid-torso and one on each thigh. The reason behind this is more to do with the chosen title. Each suspension wire, or string, would be anchored to the piece through a hole drilled in a one cent coin, secured underneath the framework. Have you worked it out yet? The title of the piece was to be - " The six cent's" (sixth sense) - I know, sometimes I even amaze myself !
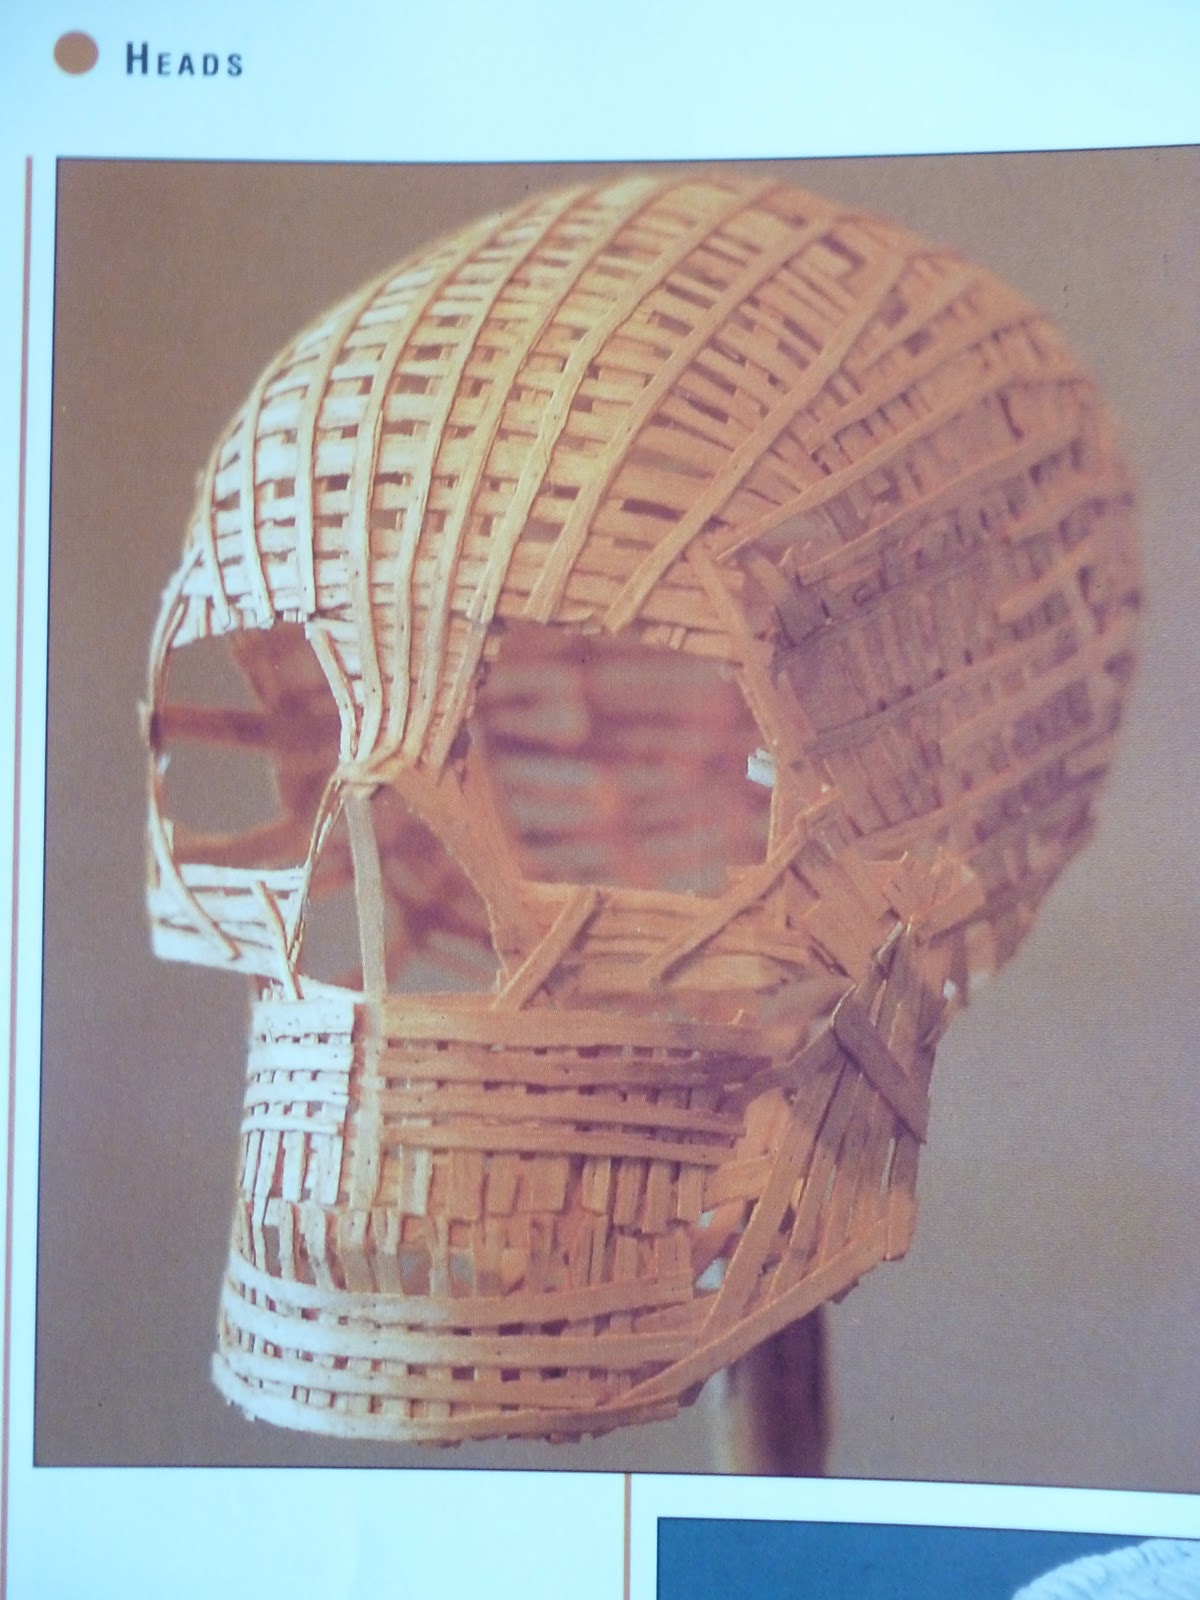
Before I sign off, and go and relax (suspension ?), I'm just going to show you a few images of a variation of this piece. If you noticed the leg form in the previous blog, made in a similar style, these are some images of how that has developed.


For this piece I used newspaper, which is fine, but a few things need to be considered for future attempts. Printed newspaper can leave your hands fairly black, which can transfer onto the work. I also used 'discount store' masking tape which began to unravel the following day - it's worth paying more for decent tape. I also invested in a hot glue gun which saves time but joints are prone to opening again after movement so a more rigid composition works best. Anyway, that's all for now - I'm off for a float in the bath, but before I do I'd like to wish ye all a Happy new Year.


Wednesday 12 December 2012


Ho, Ho, Ho - don't worry, I'm not getting into the festive spirit - I just got the punchline to a joke I heard recently (last week). Seriously though, I do like Christmas. Sitting in front of a big open fire, feet up, roasting me chestnuts. Glass of malt in one hand, big fat cuban in the other...a cigar that is. Anyway that's next week, this week I'm still working on my project. I've been doing a few things with paper as you can see in the photos.

I know it resembles a skeleton at first glance but that's just because I began  with a representation of an upper torso and the first thing that springs to mind is the rib cage. I'm not intending to replicate a skeleton as you will see in later images.
 The image on the left is a development of the same idea, a paper frame representing a body's space. Not a full body this time but more of a composition of limbs, maybe, gonna see where it goes before finishing.


I just felt I had to show this image of a skull because it sort of goes with what I'm doing, and I think it's really cool. It was made by a guy called Chris Dunseath and called 'Veneer skull'. Constructed from laminated ash veneer. Strips of veneer were laid over a plaster skull, coated with wood glue and then covered with more strips, which were held in place with pins. I like the combination of semi-transparency verses the solidity of the wood. What's also appealing is the texture and colour of the ash strips. This would definitely be a material to consider using for a more permenant piece. Image and construction details taken from 'The encyclopedia of sculpting techniques' by John Plowman.

So that's it for this post - I hope to get another one on before the holidays and who knows, I might just wish ye all a merry christmas.

Saturday 8 December 2012


Time for an update on my project. This post is actually a lot later than it should have been due to unforseen circunstances. It's regarding some stuff I was trying out using natural materials, in this case twigs. Ever since seeing creations by Andy Goldsworthy I have to confess I've been itching to experiment along a similar vien. As I may have mentioned some time ago, I had found some flexible twigs in the garden, and intended to try and substitute them for the wire I had been using (3D wire mesh forms). So last weekend - 01/12 - I made some time and had a go.


In the first image you can see that I started off by making circular shapes by forming a circle and simply winding each end around it so that it gets held in place by its own tension. In the second image I pushed four twigs into the ground  and weaved some circle shapes through them into a crude cylinder. I was also able to make a sphere by interlocking some circular shapes and so without any specific design in mind I just tried randomly placing the various pieces around the cylindrical shape. No other materials were used and all seperate pieces were joined using either weaving or interlocking. I guess it's like wicker-work but I wanted to leave gaps in the forms for a mesh effect (translucency). Next time I'm going to create something tighter, more solid. All in all I have to say it's a good material with lots of potential. Not surprisingly AFTER I'd finished I remembered that there are several hazel trees at the end of the neighbours field. I know that hazel is flexible and strong so I think I'll be taking a walk down that direction soon.


Thursday 29 November 2012

Back again, just a few more images that relate to my project. The first one, 'Origin of the beginning 1.3', is by dutch photographer Levi Van Veluw is a self portrait. I like it because the figure blends into the background almost becoming invisible. Leaving you with a 'sense' of its presence.
The second image,'A table la chaise electrique No1' (The electric chair), is by french photographer Laurence Demaison. "Using a process known as 'dissimulation', a technique in which back lighting, reflections and saturated whites conceal or disguise the subjects true form, creating a disturbing yet fascinating world". Again I think it creates a sense of 'real or unreal' which could be applied to my project.
Images and reference from the book 'Crazy Photographt' by Diane Routex.

Wednesday 28 November 2012

Hello bloggers, I've been doing some research on transparent or semi-transparent imagery for my project. As I'm sure I must have mentioned, I think to project a 'sense' of something it needs to be kind of vague, mysterious, semi-solid. I really like the work of chinese artist Liu Bolin. As you can see from these images he paints himself to blend-in to any whichever background he chooses making him appear almost invisible. Even after finding him in the image there is a certain ghost-like quality to his presence.


I have a few more good images to upload but it's taking too long on this computer. I'll try again tomorrow on one of the college computers - dead fast in comparison.


Tuesday 20 November 2012

Well I made another casting from the mold, this time using a material I hadn't heard of before - Jesmonite. I think it's a mixture of plaster and resin so it's fairly strong when set. Not surprisingly it went a bit pear shaped as I left the mixture in the mold overnight (to set). Unfortunately when I tried to remove the cast it had set to the mold. Did I mention that you live and learn? I think that next time I should do a bit of research into the correct procedure before I go casting again.
So the mold had to be broken to get the Jesmonite cast out. As it happens there were bits of the plaster mold still stuck to the Jesmonite which actually looked cool so I decided to leave them there for now.
O.k. so maybe it looks a bit wierd but there's potential for experimenting. Any way if you think that looks wierd check out the next image. I decided to try and faintly colour the cracks that occured in the first wax cast. On hindsight I guess using watered down ink or even watercolour paint might have worked better, but at the time I used watered down acrylic paint which didn't really achieve the result I was going for. As you can see from the image the whole cast ended up coloured. Turned into a bit af a happy accident though as it gave the whole thing a new dimension. It's a bit freaky though - you need to see it in the flesh, so to speak. Still, it's given me a new angle for experimenting with ideas so i'll keep ye posted.


Tuesday 13 November 2012


Hello fellow bloggers, I have been doing a bit of casting from the mould I made last week. Hopefully I can upload images of these (without losing them).
     
As you can see the original mould was a bit fragile so it had to be reinforced with clay. Apparently I didn't need as much clay as I used but sure you live and learn. After packing clay around the mould it was ready for casting.
 I had planned to do a fibreglass resin cast but it wasn't possible on the day so I made the first casting with wax. This is the result of the first attempt. Not surprisingly mistakes were made. Left to my own devices I had assumed that the melted wax gets poured into the mould - so thats what I did. Didn't realise (until it started leaking) that the wax should be built up in layers. Luckily one of the technicians was on hand to show me the correct proceedure.


The second casting was more succesful, though I may have left the cast in the mould longer than I should have - it was a struggle to remove. This cast was also stronger and thicker as I had a better idea of what to do. I also noticed that the mould is starting to deteriorate a bit, possibly due to leaving the wax in to long on the second attempt. I was going to try a rubber casting next but it looks like there's none left till the new year so I'll try fibreglass resin instead. Watch this space.


Wednesday 7 November 2012


Hi again, since I last posted I've done a bit more with the plastic straps. The original cylindrical shape was based on a leg so I continued with that as you can see from the images.
It is difficult to maintain the desired lines as the straps retained there original folds to an extent but with practise I'm sure some good results could be achieved. I also stapled any joints together which proved awkward as the gaps got smaller so maybe using hot glue or similar would be more efficient.
 

As you've seen before I previously made a plaster-bandage mould of my hand, well half of it, intending to make the other half and join them with a hinge of some sort. The idea being that the mould could be opened (like a box) to show the amount of space my hand uses / needs. It's also a representation of a 'sense' of my presence - at least the hand - as you can't help imagining the hand that once occupied this empty space. After discovering the convenience of plaster-bandage to create moulds I have to confess I was like a small child with a new toy. Are the possibilities endless? Anyway I'm afraid to say the other half of the hand mould got put on hold as I was itching to make a mould of my face and hadn't enough plaster-bandage to do both. I went with the face. This process takes a bit of planning, especially if your alone when trying it. I had to consider stuff like covering the eyes - when closed. Breathing - often useful - could have been a problem as like most people at the moment I have a head cold and would have to breath through my nose. As I knew the p-b would set fairly quickly I decided to take a chance on my nose staying clear, a hot whiskey also helps. It turned out the p-b didn't actualy set as quickly as I'd anticipated (10 mins). Setting the alarm on my mobile for 10 mins after I'd applied the final piece of p-b - left eye - I sat and waited, eyes covered, mouth covered, hoping I wouldn't get a blocked nose. Thank God I'm not claustrophobic.
So (a long) 10 mins later when the alarm on the mobile rang, I felt the p-b wasn't yet set enough so decided to wait a bit longer before removing the mould. As I couldn't see the buttons on the mobile when switching off the alarm I was pleased to hear, after 1 minute, the alarm going off again - with an update on the time, luckily. Must have a snooze facility but for only 1 minute - that can get annoying. And it did.  In fact it was twenty minutes after the first alarm before I was confident that the p-b had set firmly enough. Naturally it didn't just lift off as I'd expected. Took another five minutes of gentle persuasion and cursing, and maybe a few seconds of panicking, but I got it off in one piece and I have to say I'm quiet pleased with the result. Think I'll need to reinforce it though as it's a bit fragile. It's kind of like a face shaped poppadom at the moment. Pity I hadn't thought of doing this in time for Halloween - maybe I could've made a good mask from the mould (obviously with alterations....to make it scary......o.k. scarier)

Thursday 1 November 2012


Hi guy's, guess it's been a while since I last posted. We got our essay subject's so I've been reading up on those topic's. With regards to my project I was trying out some new materials. I had gathered some light twigs from the garden, not sure what plant the're from, but they are still green and very flexible. My intention was to mimic the wire-frame style of construction to create cylindrical shapes. Just experimenting as yet. Making small circles proved difficult, as did joining the twigs together. Twisting several together gave a nice effect - sort of like the tendons, sinews, viens etc. that you might see on a human body. There is also something very primitive, instinctive, about working with natural materials.

I have been wanting to try out paper mache as a material as I've never made anything with it before. As I had made a cast of my hand in plaster before I wanted to see if this could be done in paper mache.
Not sure about the mixture I made but after an hour it was still damp. This is after applying to my hand and trying to dry, after 30 minutes, with a hair dryer. I was unable to cover much of my hand as I kept moving it, should've kept it flat on the table. I'll have to look up or create a quicker drying mixture but the result wasn't that bad. I think I also need to decide on a pose for my piece so that I discover  any construction problems early on.

I                                                                                                      
 
I also tried using some plastic straps to create shapes. In this case I used the straps that hold bales of briquettes together. Though very flimsy on their own, once joined together in a structured way they begin to take on some rigidity. Some problems I encountered were eliminating the angles caused by the bales, you can fold them kind of straight but they spring back after a while. There is also the supply to consider, it's surprising how quickly they dissapear ( I used 7 making the shape in the photo). Definately worth using again, maybe combined with something else. Their lightness is a big plus for larger projects.


Thursday 18 October 2012

Hi all, going to start todays blog by uploading the image of my paper-straw
head, as promised yesterday. Had to take a new photo of it and as you can see it's now up on the wall. Although not completed I've taken this experiment as far as I want to for now. I'm not discounting doing a piece using paper straws - it's just that at the moment I'm keen to try other materials and so I will limit my time spent using each one while experimenting.

Anyone need a hand?
 Another idea I have to give a sense of my space is to cast the space I occupy ( at present ), so that when the cast is removed, the imprint left behind is a visual record of my space for as long as the cast exists. I actually thinking of how a full body cast would work if say the front half of the body was cast, then the back half, then they could be hinged together. A bit like the old Iron Maiden torture device, or maybe painted on the outside to resemble an egyptian phaeros casket. Might just create a big mud puddle in the garden and lie in that - wouldn't that look good on the wall?
Just wanted to give you all a link regarding a style of wire sculpture I saw lately that I really liked. It's by an artist called Tomohiro Inaba and has a real mystical quality which is something that I personally associate with the word 'sense'. http://www.thisiscolossal.com/2011/07/wire-sculptures-by-tomohiro-inaba/. Another link that I'd like to add is for a paper sculptor called Peter Callesen. http://petercallesen.com/info/galleries.Makes me want to experiment some more with paper.
   I watched a video clip of a sculptor at a recent tutorial by the name of Andy Goldsworthy. It showed him building a stone cairn on the seashore and then watching the effect the tides had on it. On recognising his name on a book in the library today I took it off the shelf to see some of his other work, and I have to say it has opened up a whole new avenue of ideas for me.
 The range of natural materials and settings he incorporates in his work is amazing. Having been advised to try out 'found' materials, possibly something from where I live - to include a sense of personal space in my piece - I'm going to attempt something with these shoots that were growing at the base of a tree in the garden. (see image on the left ) Not sure what kind of tree but I'll get back to ye with the next update.